OBS General settings
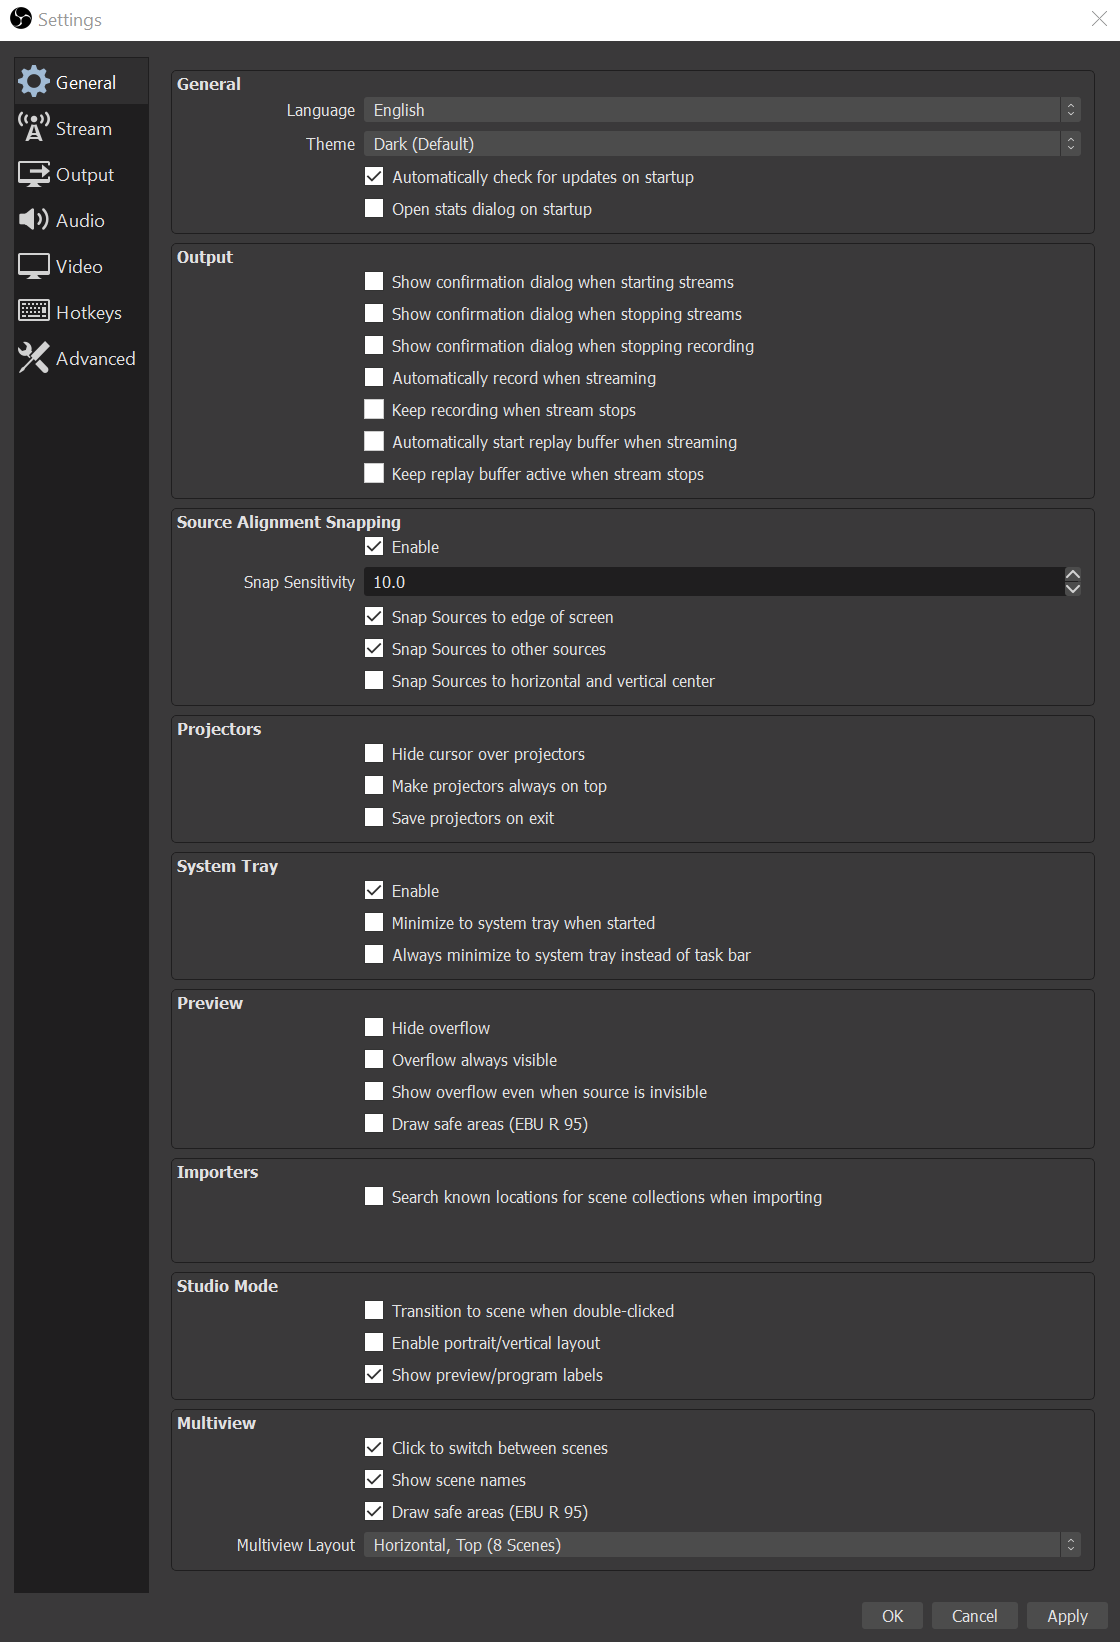
Here you can make valuable settings, such as a confirmation prompt when starting a stream. This way, you can prevent your live stream on Twitch from starting too early by accidentally clicking on it. It also determines whether your stream should be recorded directly and, by default, how the sources align within the image.
Feel free to try around to see which settings you like best for your Twitch stream. In the beginning, however, not much needs to be done here. It's best to enable the security prompts for starting and stopping the stream; you can ignore the other options now since OBS already works with suitable default values.
Stream settings
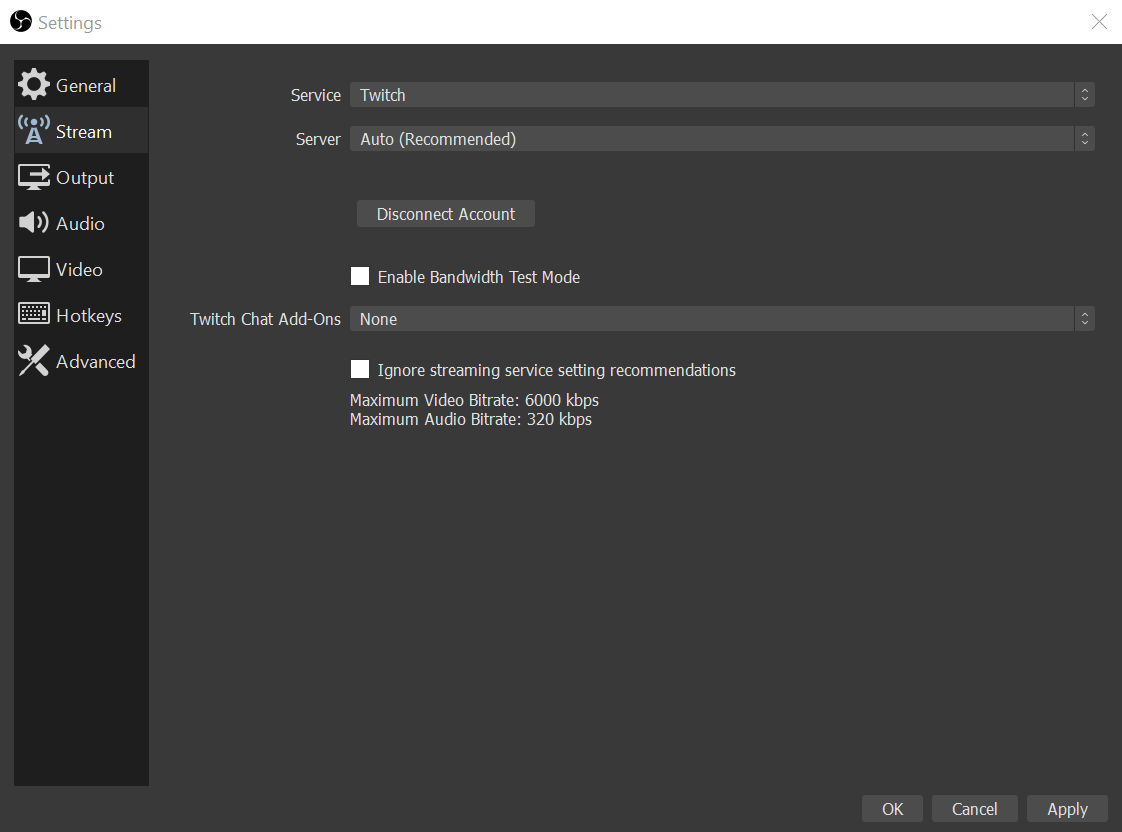
Firstly, choose your preferred platform from the list, and then look for a server that is as close as possible. There are usually several servers in question, which is why you can play around a little here. If desired, select the server with the best performance. Otherwise, the "automatic" setting works well here as well.
OBS allows you to connect an account instead of using the stream key in some versions; this is very useful because OBS automatically selects the platform settings based on the account.
Otherwise, you'll need your stream key, which you can get from Twitch by going to "Creator Dashboard" -> "Settings" -> "Stream" and entering it into the corresponding field. You can find the stream key for YouTube by visiting the YouTube website in a browser and starting a live stream. You can also copy the stream on Facebook.
Note: Never share your stream key and change it immediately if you accidentally show it in the stream. Otherwise, anyone can stream under your name!
If you are connected to Twitch, you can add which Twitch chat add-ons you want to see in OBS Chat.
Output & Bitrate
Output
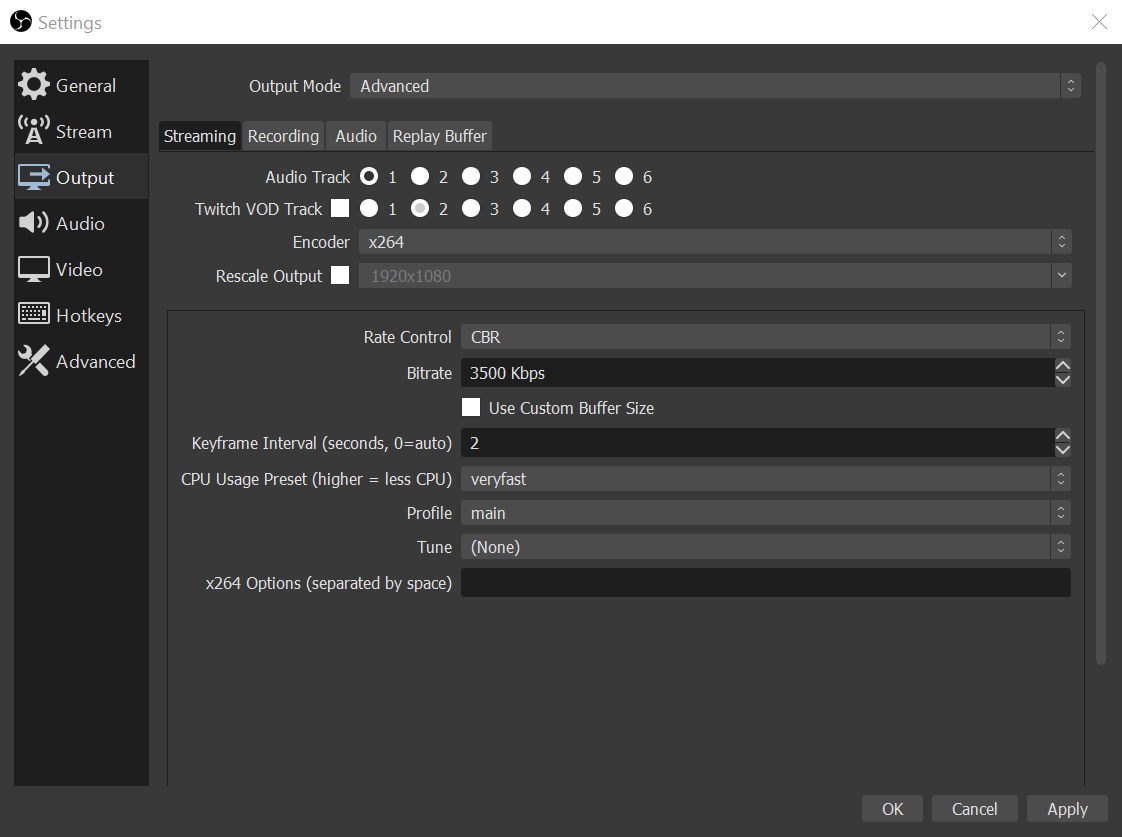
OBS supports different encoders if you have the right technical requirements - either you can stream via the CPU or the GPU if you have a good graphics card. By default, the encoding of your stream is done by your CPU, but if you have an AMD or NVIDIA graphics card, it's best to switch to it.
It's important to always keep an eye on what your workload is. If you are playing a game that is already using 99% of the graphics card, streaming will be difficult. Then OBS won't run smoothly anymore, because the game is always preferred. Try to reduce the load on the system so that you don't reach the 99% with the game and OBS! This applies to all systems. You can achieve the load for example by closing programs that don't need to run or by lowering the quality of the game.
If you want to change more than the existing settings in the output mode, click on Advanced in the drop-down list under "Output mode". Before we go into the graphics card specs, we'll show you one more item that is equally important for all encoders: the bitrate.
Bitrate
For Twitch, CBR should be selected as the quality control method. This feature keeps the bitrate and thus the quality constant (if you are using another platform and it is not explicitly recommended otherwise, you should use CBR there as well). If your internet connection is strong enough, you can select up to 6000 Kbps as maximum value under Bitrate. This is currently the highest bitrate value allowed for non-partners.
However, please keep in mind that your channel will not have any "transcoding" options available, at least at the beginning. This means that viewers will not be able to lower the quality of the stream on their own. This means that viewers with weak internet connections may not be able to watch your stream without problems if you have chosen a bitrate that is too high. A bitrate of 2200 to a maximum of 2500 is often recommended, which of course leads to poorer image quality of the stream. However, you can always change the bitrate during the stream. So you can also adjust it according to your viewers if they can't follow your stream without problems. Many stream with about 4500 Kbps.
However, the game itself usually needs some bandwidth as well, so a maximum of 80% of the total upload should be reserved for streaming.
Output x264 CPU
Let's start with the x264 encoder. x264 uses your CPU to render your stream; this means your graphics card is not used in the encoding process; when do you generate with x264?
If you intend to stream and game on the same computer, x264 is not recommended unless you have a CPU with more than 12 cores. You can use x264 if you only stream "just chatting" or via a console (+ capture card).
As long as you keep the points mentioned above in mind, x264 provides stable performance. Otherwise, it can significantly strain your system, resulting in low FPS, which will impact both the game and the stream.
In most cases, leaving the CPU presets at "very fast" or "faster" is sufficient. However, if you have a powerful CPU, you can try more powerful settings (e.g., "fast" or "medium") or reduce the load even further if your CPU is no longer the youngest (e.g., "superfast"). However, the quality of your stream will deteriorate. It is best to test until it fits in this case.
The rest can be left, shown in the image. As previously stated in point "Bitrate," you can play as much as you want with the bitrate.
Output NVIDIA NVENC Specs
NVIDIA NVENC is available if you have an NVIDIA graphics card on your PC. The graphics card must be able to support the encoder.
This is not the case for every NVIDIA graphics card. It depends on the generation. But you can quickly check this: If there is H.264 available for selection in the settings at Output > Encoder > NVIDIA NVENC, then you can stream with your NVIDIA graphics card.
The updated NVIDIA encoder (NVENC) on Turing-based NVIDIA GeForce GPUs (RTX 20 series and GTX 1660/Ti) usually delivers better quality than x264 Fast and comparable quality x264 Medium. For the older generation (Pascal, Kepler), the quality is similar to x264 very fast/fast.
So, when should you put this graphics card to use? The encoder is a good choice if you want to play and stream on the same PC. First, NVIDIA NVENC provides high quality, and second, your PC consumes less power when rendering.
NVIDIA NVENC is also the best option for streaming your console game using a capture card. Only in a dual setup should x264 be considered. If you're streaming on one system, but the image is coming from another, you'll need a higher bitrate.
You can make the following settings in OBS:
- As already mentioned, select CBR for the quality control method.
- Set the bitrate as described under "Bitrate".
- Write "2" instead of "0" for the keyframe interval in seconds.
- Choose the default setting so that your graphics card can handle it best. If you have a sound, newer graphics card, you can go to "Quality," otherwise instead to "Performance".
- For the profile, it is best to leave "High." It can rarely happen that viewers with older devices see a black picture. If this happens, you can change to "Main." Please adjust this according to your viewers. Generally, "High" is recommended.
- For slow games (for example, Age of Empires or Sims), you can choose Lookahead for fast games Psycho Visual Tuning (for example, Call of Duty); this for the keyframe interval in seconds write again affects the quality of the stream.
- You can leave the GPU at 0 if only one graphics card. There are often two graphics cards - then you can enter "1" because this is usually the better graphics card.
- Max. B-frames can be left at 2.
Output AMD Encoder
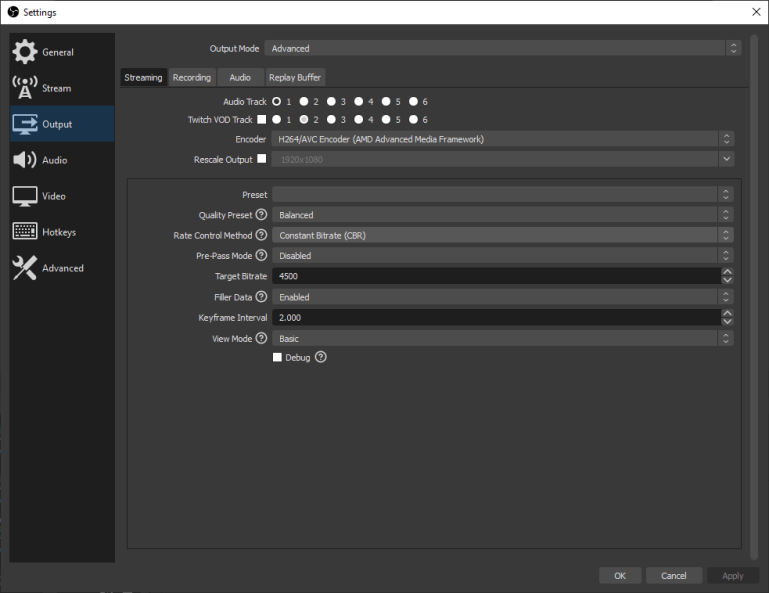
If you have an AMD graphics card in your system that is also supported by the encoder, it will appear in OBS as "H.264/AVC Encoder"
You should be aware of the following issues when using the AMD encoder:
- In the present, you select the desired platform on which you will stream.
- In the "Quality preset," you have three options: "Speed," "Quality," and "Balanced." You can try "Quality "if you have a new AMD graphics card, you can try "Quality." You have to adjust it according to your hardware. If you have a slow graphics card, then choose speed. The quality is worse, but the stream runs smoothly.
- The pre-pass mode helps you again to improve the quality of your stream. Again, only leave this on "Enabled" if your graphics card can handle the stream. If you notice that the graphics card has problems, select disabled here.
- Set the target bitrate like in "Bitrate".
- You can leave the view mode on "Simple".
Do you want to learn more about the specifications? Here's what you should know.
Twitch and YouTube have their website for the perfect settings, which shows you which settings are best for your setup. More information can be found by clicking on the respective platforms!
Audio
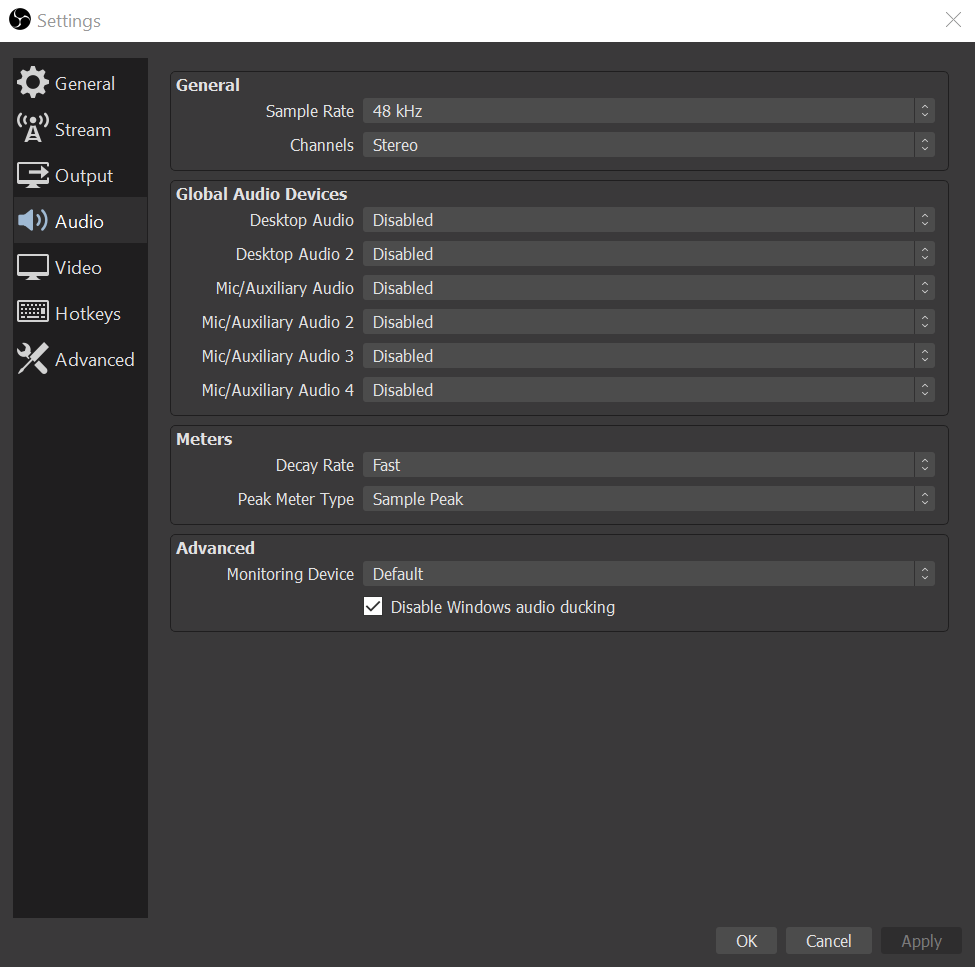
You can select your respective audio devices for your stream here, allowing you to match multiple output devices or microphones perfectly. Each device can have its Push-To-Talk or Push-To-Mute button, as well as any desired delays.
We explain each category and what you can choose from it below:
General settings audio
- Sampling rate > 48kHz. The more kHz, the better the sound quality; the maximum is 48kHz.
- Channel > Stereo. Here you can select whether you want to hear the sound in surround, mono, or stereo. When streaming, most platforms allow you to use stereo. It would help if you also used this option, as Twitch and other streaming platforms will convert your audio to stereo. If you want to record a game and record all the surround audio channels individually, you can do that. As soon as you upload the video to YouTube, the audio will be converted to stereo.
You can manually select your headphones, speakers, or microphones with global audio devices, and you can add up to 4 microphones/devices.
- Desktop Audio > Choose your headphones or main speakers. If you have two devices and want to get audio from both, you can also use Desktop Audio 2.
- Microphone/Aux Audio > Choose your microphone.
Note: Normally, a streamer has only one microphone; if you're streaming a podcast and there are multiple people in the room, each with their microphone, you'll need to add new microphones/additional audio devices.
Optional sound settings
If you want to monitor your stream using a pair of speakers or an external sound card, go to Advanced > Monitoring Device > and select your preferred device from the list.
The "Meter" settings are optional, as they are so that you can see the green bars in your mixer decay faster or slower and adjust how you want them to. Here, if you have a good CPU, you can set the decay rate to "Fast" and the peak meter type to "True Peak" it's not a must.
You can enable a keyboard key (hotkey) to mute your audio devices at the bottom of the Audio tab. All audio sources in your stream are listed here, from microphone and desktop audio to alarm or overlay sounds.
VoiceMeeter as an alternative to OBS Audio
Many streamers also use VoiceMeeter to control their stream because you can also use it to control the sound to hear different sounds than your stream, for example.
Video
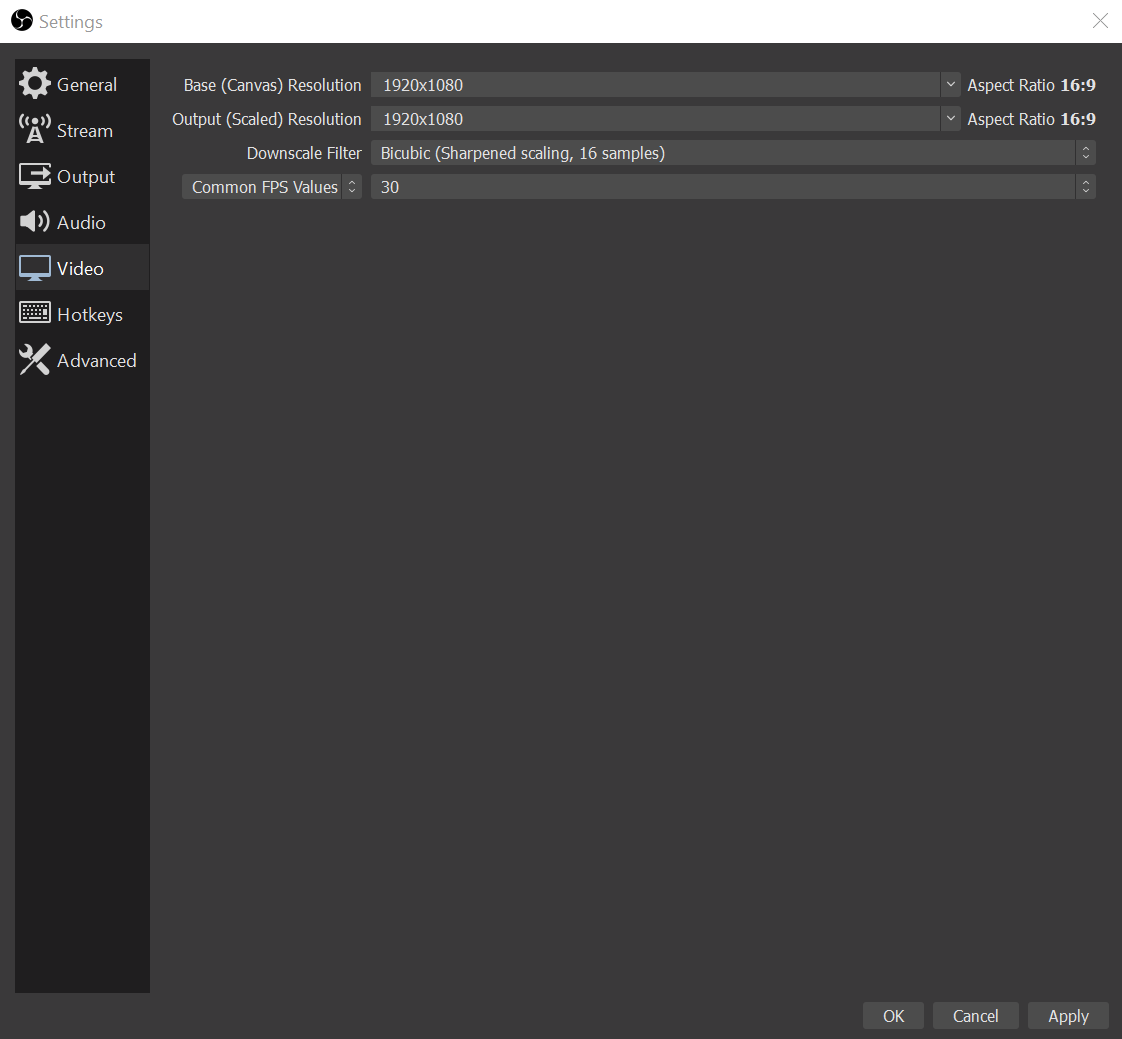
The OBS base (canvas) resolution should always be the same size as your monitor or game (if you are not playing in fullscreen mode) to avoid annoying borders in the stream.
However, in OBS Studio, a second setting describes the resolution in which your game will eventually be displayed in the stream: (Scaled) Output Resolution; this implies that the image is scaled down, allowing OBS to be more resource-efficient.
If your stream uses less bandwidth on your side and the viewer, many successful streamers stream with a scaled resolution of "1280×720", considered more than sufficient.
Using the scaling filter, you can improve your stream quality a bit - in most cases, "Bicubic" offers a good average value. However, if your computer and internet connection still have room for improvement, you can also try the "Lanczos" setting.
FPS (frames per second) rate of 30 FPS is usually sufficient to achieve a high-quality stream and save resources.
Of course, at 60 FPS, there is a noticeable increase in quality; it is nowhere near as drastic as the jump from 30 to 60 FPS within a game.
It's best to try something out for yourself here and get some feedback from your viewers!
Advanced settings
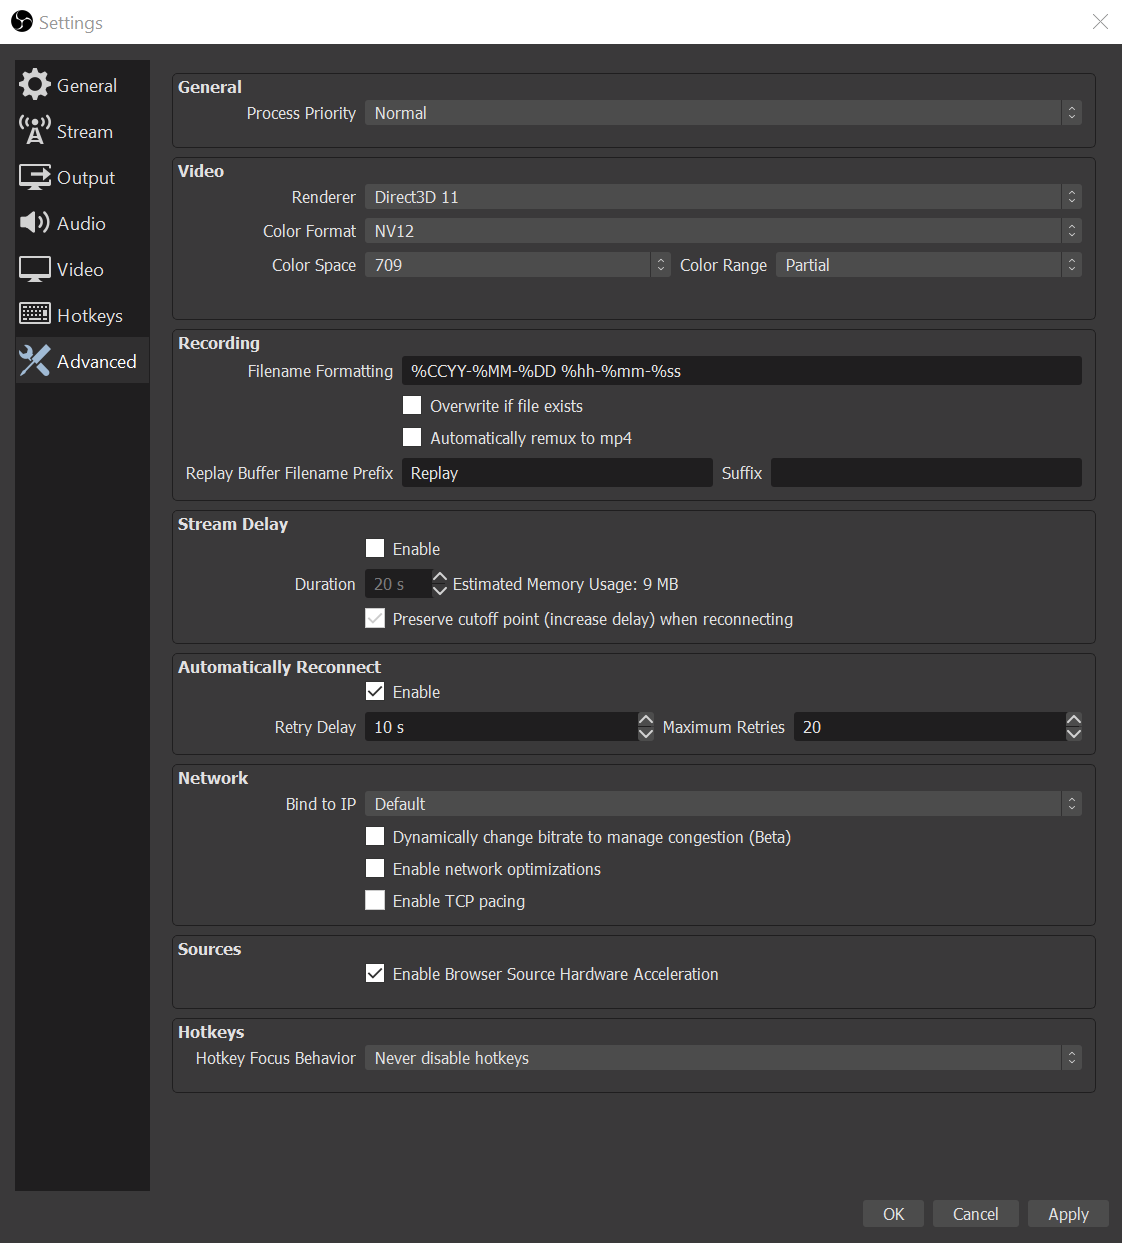
Now we take a closer look at the "Advanced" tab.
Auto-reconnect can be helpful when there are minor disconnections, for example, in a WLAN.
OBS also provides the option of a stream delay, which causes the stream to be broadcast with a time delay. Especially useful if a live tournament is being broadcasted or if you want to protect yourself from fellow players watching the stream to gain an advantage (so-called "stream sniper"). Yet, this is provided by services such as Twitch, YouTube, and Facebook; the option does not need to be enabled in OBS.
Note: If you are streaming with delay and the show ends, do not close OBS immediately; otherwise, the viewers might not get the end! The program must remain open for the delay duration, even if the delay has been set on the respective streaming platform.
Saving the stream as a file is recommended to create highlight videos for YouTube or complete VODs for other platforms later, as they do not stay saved on each platform forever. The only disadvantage is that the files take up a lot of space. But you can also download your stream later on the platforms. You can find more info on how to download your Video in our blog article about VoD download
With the Replay Buffer, you can save a recent action and show it again as an "instant replay" at the push of a button. By the way, you can also involve your viewers by using boom.tv. This allows viewers to create replays themselves, shown live in your stream. At the end of 2021, Twitch also rolled out a feature that will enable viewers to rewind the stream in the Twitch browser for two minutes.
Internet connection & final setup
Your internet connection
Another thing you should be aware of is your internet connection. It is not in the OBS settings, but knowing your internet connection is critical for streaming. It has an impact on the maximum quality at which you can stream.
Your connection has a direct impact on your video and audio settings. The higher the bitrate and quality you can use for video and audio, the better the connection. It is sufficient to have an Internet connection with an upload speed of about 5 Mbps.
Websites such as https://www.speedtest.net/ allow you to test your connection speed.
All set: What's next?
Of course, basic settings aren't enough for a good stream. A slew of other locations must be tweaked to achieve a professional appearance. These include, for example, appropriate sources such as the webcam, specific displays about followers, donors, and subscribers, a countdown, sponsor logos, or simply the score of a current tournament series. Many of these points are already covered by OWN3D Pro with a single click. You can learn more about OWN3D Pro in our article.

